jquery4u.com - Archives (janvier 2016)
1 jQuery Fan Blog for your Daily News, Plugins, Tuts/Tips & Code Snippets.
HTML5 lets you draw graphics straight into your web page using the <canvas> element and its related JavaScript API.
In this post, I’m going to introduce you to jCanvas, a free and open source jQuery-based library for the HTML5 Canvas API.
If you develop with jQuery, jCanvas makes it easier and quicker to code cool canvas drawings and interactive applications using jQuery syntax.
What is jCanvas?
The jCanvas website explains:
jCanvas is a JavaScript library, written using jQuery and for jQuery, that wraps around the HTML5 canvas API, adding new features and capabilities, many of which are customizable. Capabilities include layers, events, drag-and-drop, animation, and much more.
The result is a flexible API wrapped up in a sugary, jQuery-esque syntax that brings power and ease to the HTML5 canvas.
jCanvas enables you to do everything you can do with the native Canvas API and more. If you prefer, you can also use native HTML5 Canvas API methods with jCanvas. The draw() method serves just this purpose. Furthermore, you can easily extend jCanvas with your own methods and properties using its extend() feature.
[author_more]
Adding jCanvas to Your Project
To include jCanvas in your project, download the script from the official website or the GitHub page, then include it in your project folder. As mentioned, jCanvas needs jQuery to work, so be sure to include that too.
Your project’s script files will look something like this:
[code language="html"]
<script src="js/jquery.min.js></script>
<script src="js/jcanvas.min.js></script>
<script src="js/script.js></script>
[/code]
The last one would be where you put your custom JavaScript using the jCanvas API. Now let’s take jCanvas for a test drive.
Setting up the HTML Document
To follow along with the examples, start by adding a <canvas> element tag to a basic HTML5 document.
[code language="html"]
<canvas id="myCanvas" width="600" height="300">
<p>This is fallback content
for users of assistive technologies
or of browsers that don't have
full support for the Canvas API.</p>
</canvas>
[/code]
Here are a few points of interest about the code snippet above.
- By default, the dimensions of the
<canvas>drawing surface are 300px by 150px. You can modify this default size in the width and height attributes inside the element’s markup. - Adding an
idattribute is not required but will be an easy way to access the element with JavaScript. - Content inside the
<canvas>element is just a bitmap image. This makes it inaccessible to users of assistive technologies. Also, browsers that don’t have support for the Canvas API will not be able to access its content or interact with it in any way. Therefore, while techniques aiming to make<canvas>more accessible are yet to be made available, adding some fallback content for this category of users is the recommended practice.
If you were to use the native Canvas API, your JavaScript would look something like this:
[code language="javascript"]
var canvas = document.getElementById('myCanvas'),
context = canvas.getContext('2d');
[/code]
The variable context in the code above stores a reference to the 2D context property of the Canvas object. It’s this property that enables you to access all other properties and methods exposed by the HTML5 Canvas API.
If you’d like to learn more about the topic, HTML5 Canvas Tutorial: An Introduction by Ivaylo Gerchev is a great read.
jCanvas methods and properties already contain a reference to the 2D context, therefore you can jump straight into drawing.
Drawing Shapes with jCanvas
Most jCanvas methods accept a map of property-value pairs that you can list in any order you like.
Let’s start by drawing a rectangle shape.
The Rectangle Shape
This is how you draw a rectangle shape using the drawRect() method of the jCanvas object.
[code language="javascript"]
// Store the canvas object into a variable
var $myCanvas = $('#myCanvas');
// rectangle shape
$myCanvas.drawRect({
fillStyle: 'steelblue',
strokeStyle: 'blue',
strokeWidth: 4,
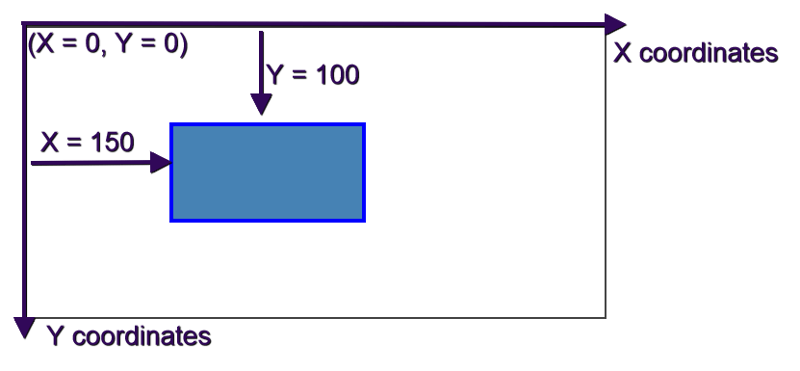
x: 150, y: 100,
fromCenter: false,
width: 200,
height: 100
});
[/code]
The snippet above caches the canvas object into a variable called $myCanvas. The properties inside the drawRect() method are mostly self-explanatory, but here’s a brief rundown:
fillStylesets the rectangle’s background color;strokeStylesets its border color;strokeWidthsets the shape’s border width;xandyset the coordinates corresponding to the rectangle’s horizontal and vertical position inside the canvas. A value of 0 for x and of 0 for y, i.e., (0, 0), corresponds to the top left corner of the canvas. Thexcoordinates increase to the right and theycoordinates increase towards the bottom of the canvas. When drawing the rectangle, by default, jCanvas takes thexandycoordinates to lie at the center of the shape.- To change this so that
xandycorrespond to the rectangle’s top left corner, set thefromCenterproperty tofalse. - Finally, the
widthandheightproperties set the dimensions of the rectangle.
Here is a demo with the rectangle shape:
See the Pen jCanvas example: Rectangle by SitePoint (@SitePoint) on CodePen.
Arcs and Circles
Arcs are portions of the rim of a circle. With jCanvas, drawing arcs is just a matter of setting the desired values for a few properties inside the drawArc() method:
[code language="javascript"]
$myCanvas.drawArc({
strokeStyle: 'steelblue',
strokeStyle: 'blue',
strokeWidth: 4,
x: 300, y: 100,
radius: 50,
// start and end angles in degrees
start: 0, end: 200
});
[/code]
Drawing arcs involves setting a value for the radius property as well as the start and end angles in degrees. If you’d like the direction of your arc to be counterclockwise, add the ccw property to the code above and set it to true.
Continue reading %Introduction to jCanvas: jQuery Meets HTML5 Canvas%
HTML5 WYSIWYG (What You See Is What You Get) editors are always high in demand. But there are now so many of them around that it's hard to find the best ones. In today's post we are going to present you what I think are 10 of the very best jQuery and HTML5 WYSIWYG plugins just to save your time finding the plugin that best fits your needs.
1. Froala

Froala WYSIWYG HTML Editor is an easy to integrate and easy to use plugin that requires minimal coding knowledge. It requires jQuery 1.11.0 or higher and the iconic font named Font Awesome 4.4.0 . In combination with all the UI and UX features it has, it also comes with a strong defence mechanism against XSS attacks.
Continue reading %10 Best jQuery and HTML5 WYSIWYG Plugins%