jquery4u.com - Archives (juin 2018)
1 jQuery Fan Blog for your Daily News, Plugins, Tuts/Tips & Code Snippets.
Axios is a popular, promise-based HTTP client that sports an easy-to-use API and can be used in both the browser and Node.js.
Making HTTP requests to fetch or save data is one of the most common tasks a client-side JavaScript application will need to do. Third-party libraries — especially jQuery — have long been a popular way to interact with the more verbose browser APIs, and abstract away any cross-browser differences.
As people move away from jQuery in favor of improved native DOM APIs, or front-end UI libraries like React and Vue.js, including it purely for its $.ajax functionality makes less sense.
Let's take a look at how to get started using Axios in your code, and see some of the features that contribute to its popularity among JavaScript developers.
Axios vs Fetch
As you’re probably aware, modern browsers ship with the newer Fetch API built in, so why not just use that? There are several differences between the two that many feel gives Axios the edge.
One such difference is in how the two libraries treat HTTP error codes. When using Fetch, if the server returns a 4xx or 5xx series error, your catch() callback won't be triggered and it is down to the developer to check the response status code to determine if the request was successful. Axios, on the other hand, will reject the request promise if one of these status codes is returned.
Another small difference, which often trips up developers new to the API, is that Fetch doesn’t automatically send cookies back to the server when making a request. It's necessary to explicitly pass an option for them to be included. Axios has your back here.
One difference that may end up being a show-stopper for some is progress updates on uploads/downloads. As Axios is built on top of the older XHR API, you’re able to register callback functions for onUploadProgress and onDownloadProgress to display the percentage complete in your app's UI. Currently, Fetch has no support for doing this.
Lastly, Axios can be used in both the browser and Node.js. This facilitates sharing JavaScript code between the browser and the back end or doing server-side rendering of your front-end apps.
Note: there are versions of the Fetch API available for Node but, in my opinion, the other features Axios provides give it the edge.
Installing
As you might expect, the most common way to install Axios is via the npm package manager:
npm i axios
and include it in your code where needed:
// ES2015 style import
import axios from 'axios';

// Node.js style require
const axios = require('axios');
If you're not using some kind of module bundler (e.g. webpack), then you can always pull in the library from a CDN in the traditional way:
<script src="https://unpkg.com/axios/dist/axios.min.js"></script>
Browser support
Axios works in all modern web browsers, and Internet Explorer 8+.
Making Requests
Similar to jQuery's $.ajax function, you can make any kind of HTTP request by passing an options object to Axios:
axios({
  method: 'post',
  url: '/login',
  data: {
    user: 'brunos',
    lastName: 'ilovenodejs'
  }
});
Here, we're telling Axios which HTTP method we'd like to use (e.g. GET/POST/DELETE etc.) and which URL the request should be made to.
We're also providing some data to be sent along with the request in the form of a simple JavaScript object of key/value pairs. By default, Axios will serialize this as JSON and send it as the request body.
Request Options
There are a whole bunch of additional options you can pass when making a request, but here are the most common ones:
baseUrl: if you specify a base URL, it'll be prepended to any relative URL you use.headers: an object of key/value pairs to be sent as headers.params: an object of key/value pairs that will be serialized and appended to the URL as a query string.responseType: if you're expecting a response in a format other than JSON, you can set this property toarraybuffer,blob,document,text, orstream.auth: passing an object withusernameandpasswordfields will use these credentials for HTTP Basic auth on the request.
Convenience methods
Also like jQuery, there are shortcut methods for performing different types of request.
The get, delete, head and options methods all take two arguments: a URL, and an optional config object.
axios.get('/products/5');
The post, put, and patch methods take a data object as their second argument, and an optional config object as the third:
axios.post(
  '/products',
  { name: 'Waffle Iron', price: 21.50 },
  { options }
);
The post Introducing Axios, a Popular, Promise-based HTTP Client appeared first on SitePoint.
Front-end frameworks are great. They abstract away much of the complexity of building a single-page application (SPA) and help you organize your code in an intelligible manner as your project grows.
However, there’s a flip side: these frameworks come with a degree overhead and can introduce complexity of their own.
That’s why, in this tutorial, we’re going to learn how to build an SPA from scratch, without using a client-side JavaScript framework. This will help you evaluate what these frameworks actually do for you and at what point it makes sense to use one. It will also give you an understanding of the pieces that make up a typical SPA and how they’re wired together.
Let’s get started …
Prerequisites
For this tutorial, you’ll need a fundamental knowledge of modern JavaScript and jQuery. Some experience using Handlebars, Express and Axios will come handy, though it’s not strictly necessary. You’ll also need to have the following setup in your environment:
You can find the completed project on our GitHub repository.
Building the Project
We’re going to build a simple currency application that will provide the following features:
- display the latest currency rates
- convert from one currency to another
- display past currency rates based on a specified date.
We’ll make use of the following free online REST APIs to implement these features:
Fixer is a well-built API that provides a foreign exchange and currency conversion JSON API. Unfortunately, it’s a commercial service and the free plan doesn’t allow currency conversion. So we’ll also need to use the Free Currency Converter API. The conversion API has a few limitations, which luckily won’t affect the functionality of our application. It can be accessed directly without requiring an API key. However, Fixer requires an API key to perform any request. Simply sign up on their website to get an access key for the free plan.
Ideally, we should be able to build the entire single-page application on the client side. However, since we’ll be dealing with sensitive information (our API key) it won’t be possible to store this in our client code. Doing so will leave our app vulnerable and open to any junior hacker to bypass the app and access data directly from our API endpoints. To protect such sensitive information, we need to put it in server code. So, we’ll set up an Express server to act as a proxy between the client code and the cloud services. By using a proxy, we can safely access this key, since server code is never exposed to the browser. Below is a diagram illustrating how our completed project will work.
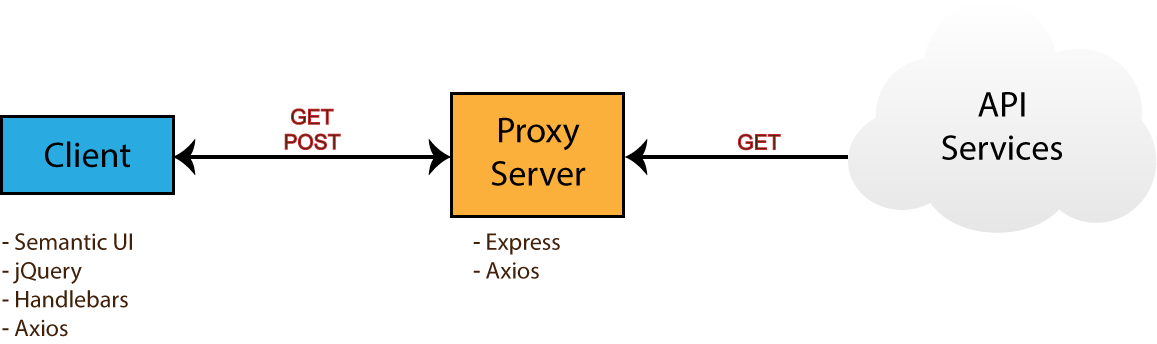
Take note of the npm packages that will be used by each environment — i.e. browser (client) and server. Now that you know what we’ll be building, head over to the next section to start creating the project.
Project Directories and Dependencies
Head over to your workspace directory and create the folder single-page-application. Open the folder in VSCode or your favorite editor and create the following files and folders using the terminal:
touch .env .gitignore README.md server.js
mkdir public lib
mkdir public/js
touch public/index.html
touch public/js/app.js
Open .gitignore and add these lines:
node_modules
.env
Open README.md and add these lines:
# Single Page Application

This is a project demo that uses Vanilla JS to build a Single Page Application.
Next, create the package.json file by executing the following command inside the terminal:
npm init -y
You should get the following content generated for you:
{
  "name": "single-page-application",
  "version": "1.0.0",
  "description": "This is a project demo that uses Vanilla JS to build a Single Page Application.",
  "main": "server.js",
  "directories": {
    "lib": "lib"
  },
  "scripts": {
    "test": "echo \"Error: no test specified\" && exit 1",
    "start": "node server.js"
  },
  "keywords": [],
  "author": "",
  "license": "ISC"
}
See how convenient the npm command is? The content has been generated based on the project structure. Let’s now install the core dependencies needed by our project. Execute the following command in your terminal:
npm install jquery semantic-ui-css handlebars vanilla-router express dotenv axios
After the packages have finished installing, head over to the next section to start building the base of the application.
Application Base
Before we start writing our front-end code, we need to implement a server–client base to work from. That means a basic HTML view being served from an Express server. For performance and reliability reasons, we’ll inject front-end dependencies straight from the node_modules folder. We’ll have to set up our Express server in a special way to make this work. Open server.js and add the following:
require('dotenv').config(); // read .env files
const express = require('express');

const app = express();
const port = process.env.PORT || 3000;

// Set public folder as root
app.use(express.static('public'));

// Allow front-end access to node_modules folder
app.use('/scripts', express.static(`${__dirname}/node_modules/`));

// Listen for HTTP requests on port 3000
app.listen(port, () => {
  console.log('listening on %d', port);
});
This gives us a basic Express server. I’ve commented the code, so hopefully this gives you a fairly good idea of what’s going on. Next, open public/index.html and enter:
<!DOCTYPE html>
<html lang="en">
<head>
  <meta charset="UTF-8">
  <meta name="viewport" content="width=device-width, initial-scale=1.0">
  <meta http-equiv="X-UA-Compatible" content="ie=edge">
  <link rel="stylesheet" href="scripts/semantic-ui-css/semantic.min.css">
  <title>SPA Demo</title>
</head>
<body>
  <div class="ui container">
    <!-- Navigation Menu -->
    <div class="ui four item inverted orange menu">
      <div class="header item">
        <i class="money bill alternate outline icon"></i>
        Single Page App
      </div>
      <a class="item" href="/">
        Currency Rates
      </a>
      <a class="item" href="/exchange">
        Exchange Rates
      </a>
      <a class="item" href="/historical">
        Historical Rates
      </a>
    </div>

    <!-- Application Root -->
    <div id="app"></div>
  </div>

  <!-- JS Library Dependencies -->
  <script src="scripts/jquery/dist/jquery.min.js"></script>
  <script src="scripts/semantic-ui-css/semantic.min.js"></script>
  <script src="scripts/axios/dist/axios.min.js"></script>
  <script src="scripts/handlebars/dist/handlebars.min.js"></script>
  <script src="scripts/vanilla-router/dist/vanilla-router.min.js"></script>
  <script src="js/app.js"></script>
</body>
</html>
We’re using Semantic UI for styling. Please refer to the Semantic UI Menu documentation to understand the code used for our navigation bar. Go to your terminal and start the server:
npm start
Open localhost:3000 in your browser. You should have a blank page with only the navigation bar showing:

Let’s now write some view templates for our app.
Front-end Skeleton Templates
We’ll use Handlebars to write our templates. JavaScript will be used to render the templates based on the current URL. The first template we’ll create will be for displaying error messages such as 404 or server errors. Place this code in public/index.html right after the the navigation section:
<!-- Error Template -->
<script id="error-template" type="text/x-handlebars-template">
  <div class="ui {{color}} inverted segment" style="height:250px;">
    <br>
    <h2 class="ui center aligned icon header">
      <i class="exclamation triangle icon"></i>
      <div class="content">
        {{title}}
        <div class="sub header">{{message}}</div>
      </div>
    </h2>
  </div>
</script>
Next, add the following templates that will represent a view for each URL path we specified in the navigation bar:
<!-- Currency Rates Template -->
<script id="rates-template" type="text/x-handlebars-template">
  <h1 class="ui header">Currency Rates</h1>
  <hr>
</script>

<!-- Exchange Conversion Template -->
<script id="exchange-template" type="text/x-handlebars-template">
  <h1 class="ui header">Exchange Conversion</h1>
  <hr>
</script>

<!-- Historical Rates Template -->
<script id="historical-template" type="text/x-handlebars-template">
  <h1 class="ui header">Historical Rates</h1>
  <hr>
</script>
Next, let’s compile all theses templates in public/js/app.js. After compilation, we’ll render the rates-template and see what it looks like:
window.addEventListener('load', () => {
  const el = $('#app');

  // Compile Handlebar Templates
  const errorTemplate = Handlebars.compile($('#error-template').html());
  const ratesTemplate = Handlebars.compile($('#rates-template').html());
  const exchangeTemplate = Handlebars.compile($('#exchange-template').html());
  const historicalTemplate = Handlebars.compile($('#historical-template').html());

  const html = ratesTemplate();
  el.html(html);
});
Take note that we’re wrapping all JavaScript client code inside a load event. This is just to make sure that all dependencies have been loaded and that the DOM has completed loading. Refresh the page and see what we have:

We’re making progress. Now, if you click the other links, except Currency Rates, the browser will try to fetch a new page and end up with a message like this: Cannot GET /exchange.
We’re a building a single page application, which means all the action should happen in one page. We need a way to tell the browser to stop fetching new pages whenever the URL changes.
The post Build a JavaScript Single Page App Without a Framework appeared first on SitePoint.
I’m willing to bet that there are a lot of developers out there who still reach for jQuery when tasked with building simple apps. There are often times when we need to add some interactivity to a page, but reaching for a JavaScript framework seems like overkill — with all the extra kilobytes, the boilerplate, the build tools and module bundlers. Including jQuery from a CDN seems like a no-brainer.
In this article, I’d like to take a shot at convincing you that using Vue.js (referred to as Vue from here on), even for relatively basic projects, doesn’t have to be a headache, and will help you write better code faster. We’ll take a simple example, code it up in jQuery, and then recreate it in Vue step by step.
What We’re Building
For this article, we’re going to be building a basic online invoice, using this open-source template from Sparksuite. Hopefully, this should make a refreshing change from yet another to-do list, and provide enough complexity to demonstrate the advantages of using something like Vue while still being easy to follow.
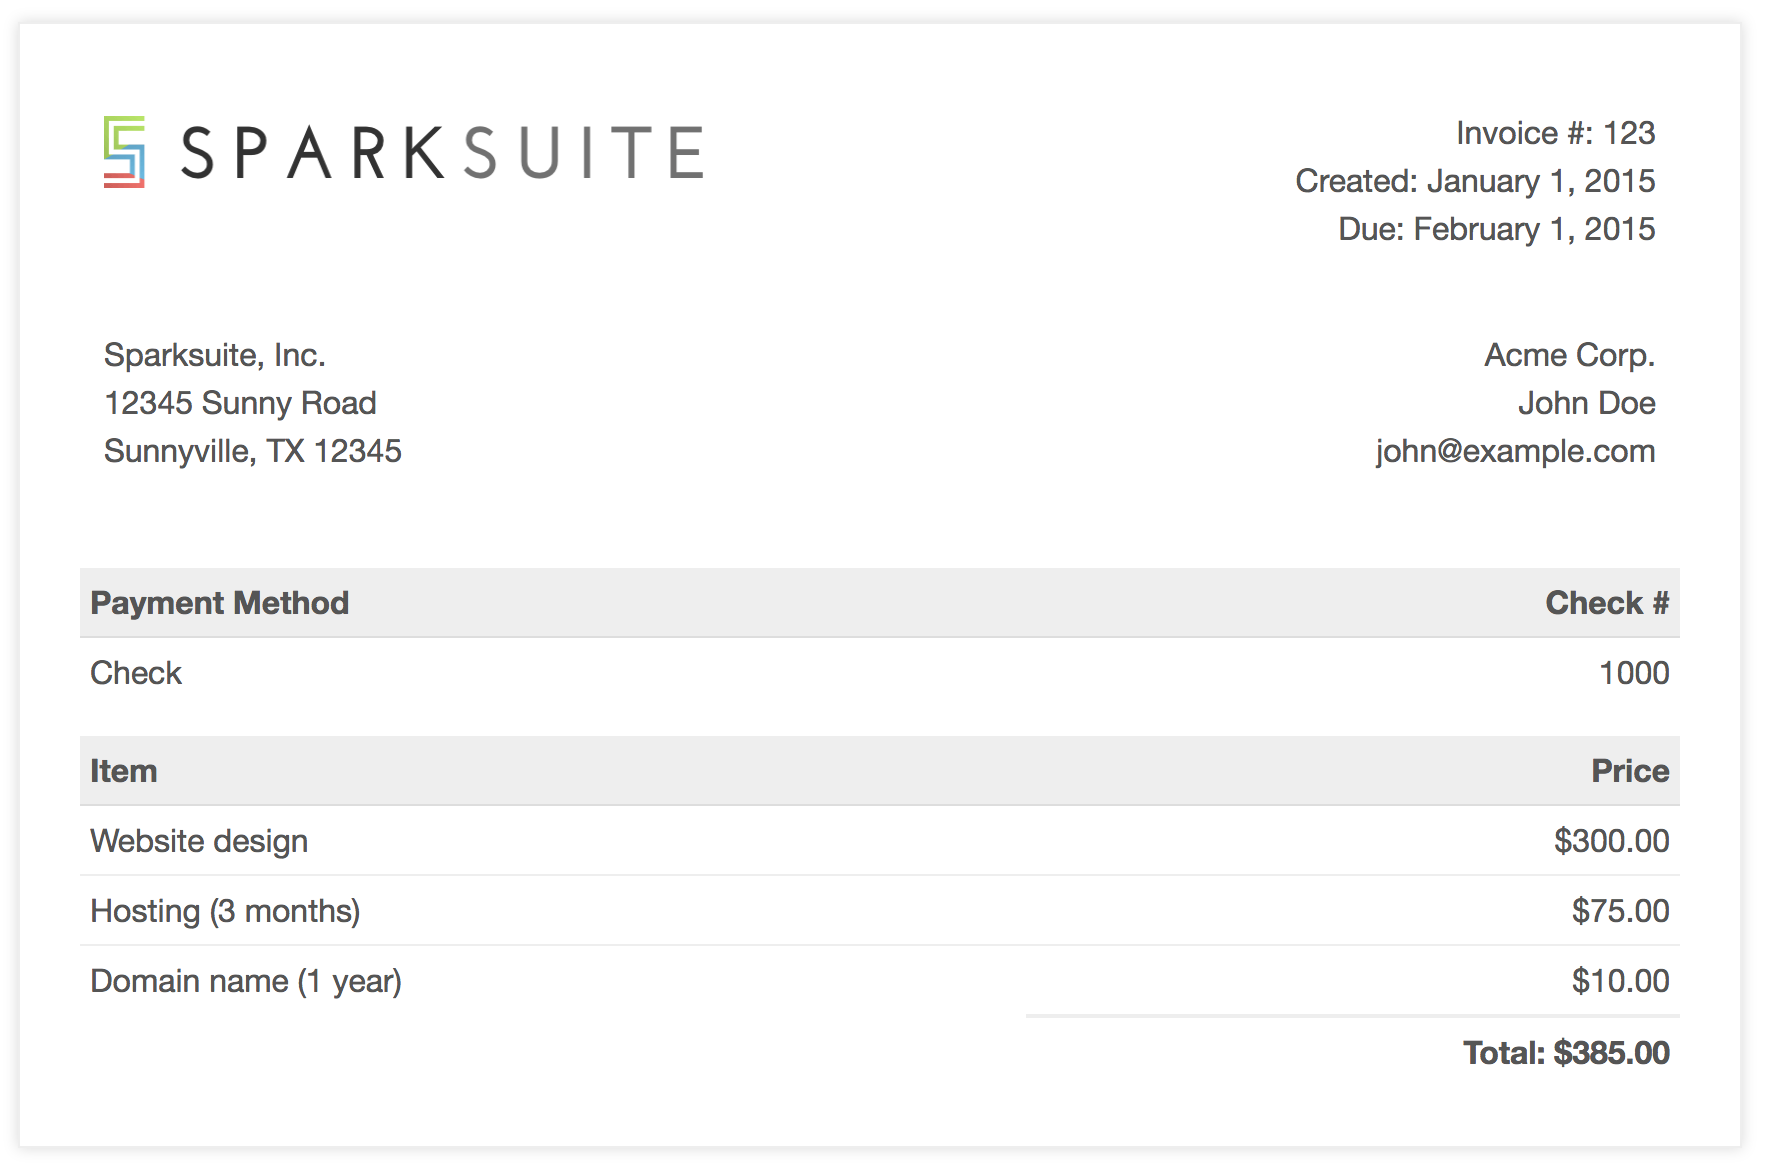
We’re going to make this interactive by providing item, unit price, and quantity inputs, and having the Price column automatically recalculated when one of the values changes. We’ll also add a button, to insert new empty rows into the invoice, and a Total field that will automatically update as we edit the data.
I’ve modified the template so that the HTML for a single (empty) row now looks like this:
<tr class="item">
  <td><input value="" /></td>
  <td>$<input type="number" value="0" /></td>
  <td><input type="number" value="1" /></td>
  <td>$0.00</td>
</tr>
jQuery
So, first of all, let’s take a look at how we might do this with jQuery.
$('table').on('mouseup keyup', 'input[type=number]', calculateTotals);
We’re attaching a listener to the table itself, which will execute the calculateTotals function when either the Unit Cost or Quantity values are changed:
function calculateTotals()  {
  const subtotals = $('.item').map((idx, val)  => calculateSubtotal(val)).get();
  const total = subtotals.reduce((a, v)  => a + Number(v),  0);
  $('.total td:eq(1)').text(formatAsCurrency(total));
}
This function looks for all item rows in the table and loops over them, passing each row to a calculateSubtotal function, and then summing the results. This total is then inserted into the relevant spot on the invoice.
function calculateSubtotal(row) {
  const $row = $(row);
  const inputs = $row.find('input');
  const subtotal = inputs[1].value * inputs[2].value;

  $row.find('td:last').text(formatAsCurrency(subtotal));

  return subtotal;
}
In the code above, we’re grabbing a reference to all the <input>s in the row and multiplying the 2nd and 3rd together to get the subtotal. This value is then inserted into the last cell in the row.
function formatAsCurrency(amount) {
  return `$${Number(amount).toFixed(2)}`;
}
We’ve also got a little helper function that we use to make sure both the subtotals and the total are formatted to two decimal places and prefixed with a currency symbol.
$('.btn-add-row').on('click', () => {
  const $lastRow = $('.item:last');
  const $newRow = $lastRow.clone();

  $newRow.find('input').val('');
  $newRow.find('td:last').text('$0.00');
  $newRow.insertAfter($lastRow);

  $newRow.find('input:first').focus();
});
Lastly, we have a click handler for our Add row button. What we’re doing here is selecting the last item row and creating a duplicate. The inputs of the cloned row are set to default values, and it’s inserted as the new last row. We can also be nice to our users and set the focus to the first input, ready for them to start typing.
Here’s the completed jQuery demo:
See the Pen jQuery Invoice by SitePoint (@SitePoint) on CodePen.
The post Replacing jQuery with Vue appeared first on SitePoint.