jquery4u.com - Archives (février 2017)
1 jQuery Fan Blog for your Daily News, Plugins, Tuts/Tips & Code Snippets.
This popular article was updated in February, 2017, to reflect the current state of jQuery pagination plugins.
Presenting a long, unwieldy list of results is generally a poor approach to displaying your information. That's why pagination, especially with longer content, is important to get right.
Server-side pagination is generally used to fetch paged content, displaying a set of results separated into pages (often with a unique URL). While that works fine, client-side pagination is another solution. Let's have a look into some jQuery-based plugins that you can leverage to create paginated results.
TWBS jQuery Pagination

This plugin helps create simple, effective, and useful pagination for your site. All you need to do is specify an element (preferably a ul or div) and the plugin takes care of the rest. TWBS requires jQuery, the plugin itself, and optionally the Bootstrap CSS.
You might find this useful in situations where you already have the data ready and are just using the paginator to switch the content in view. You can hook into the onPageClick event and determine which page to load (or optionally run an Ajax call to pull results from your DB). Either way, this plugin is simple, easy to use, and provides several configuration options to suit your needs.
The plugin looks solid and has been maintained and updated across several revisions (now up to version 1.4.1). It's a good library that looks like it will be maintained and expanded on in the future.
JQuery BootPag

jQuery Bootpag lets you create a simple pagination control with minimal fuss. The plugin has several options, such as the ability to control the next/previous labels and various classes applied to the controller (such as on first, last and subsequent page elements)
To get up and running you'll need jQuery, Bootstrap JS, and this plugin's JS files. You'll also probably want the Bootstrap CSS file unless you plan to style it yourself. Once you have those in place you can listen to the page event which is triggered when navigating between pages.
The event handles the page being requested and the event itself. It's here you can pull in content or change the DOM. Another useful element is the href property that can be set. Setting this property lets you add an anchor link to the pages' URL (e.g href: "#result-page-{{number}}") which adds the plugin's internal page number to URL. You can name this whatever you like, but it's useful for creating sets of data and maintaining state.
Where you might find this useful is instead of loading the first page by default, you could check to see if your URL contains a specific page and then initialize Bootpag to that page; loading page 7 of the results if someone navigated directly to there, for example.
The plugin hasn't been updated since mid-2015, and is currently on version 1.0.7. However, it works as you'd expect and provides enough options for you to customize it as you require.
Continue reading %jQuery Pagination Plugins%

In this article, we'll learn, step-by-step, how to build a simple jQuery plugin which sorts elements based on the values of their custom data attributes.
If you're curious about the end result, have a look at the corresponding CodePen demo:
See the Pen Simple jQuery Plugin for Sorting Elements by SitePoint (@SitePoint) on CodePen.
Note: This article assumes you have a basic understanding of flexbox, as well as how to develop jQuery plugins. If you aren't familiar with these topics, be sure to check out the links.
Accessibility Concerns
To build our plugin, we'll take advantage of flexbox's power.
By default, flex items are laid out according to their source order. But, by using the order property, we're able to change their order inside the parent flex container. Items with lower order values appear first. See an example below:
See the Pen Flexbox's "order" Property by George (@georgemarts) on CodePen.
If there are more than one items with same order values, the order for these items depends on their source order.
Although the order property allows us to easily reorder elements, it comes with an accessibility limitation: it creates a disconnection between the source order and the visual order. To better understand the problem, take a look at this article (especially at the "Source Order vs. Visual Order" section).
So, before moving on to examine how to build our plugin, please note that it won't be accessible.
The Markup
To begin with, we define an unordered list with twelve list items:
<ul class="boxes">
  <li>
    <a href="#">
      Box1
      <div class="details">
        <span class="length">13M</span>
        <span class="price">670€</span>
      </div>
    </a>
  </li>

  <!-- more list items here -->

</ul>
Notice that inside each of our list items there is the .details element, which displays some information about the corresponding item. As we'll see in a moment, we'll also add custom HTML attributes to store this information.
Note: The
.detailselement isn't really necessary. We only use it so as to have a better understanding of how the target elements are being sorted.
Next, we identify the attributes we want to sort by. In our project, these are the price and length attributes. With that in mind, we use their names to apply custom attributes (data-price and data-length) to our list items. The values of these attributes match the text values (only the numbers) of the .length and .price elements which are part of the .details element.
For example, here are the attributes for the first list item:
<li data-length="13" data-price="670">
  <a href="#">
    Box1
    <div class="details">
      <span class="length">13M</span>
      <span class="price">670€</span>
    </div>
  </a>
</li>
At this point, we specify the elements that will be responsible for sorting the list items. We use a <select> element to do this:
<select class="b-select">
  <option disabled selected>Sort By</option>
  <option data-sort="price:asc">Price Ascending</option>
  <option data-sort="price:desc">Price Descending</option>
  <option data-sort="length:asc">Length Ascending</option>
  <option data-sort="length:desc">Length Descending</option>
</select>
As you can see, all <option> elements (except for the first one) contain the data-sort attribute. The value of this attribute uses the following convention:
<option data-sort="price:asc">
So, as the value we have the attribute we want to sort by, followed by a colon along with either the “asc” or “desc” indicator.
CSS Styles
With the markup ready, let's add a few basic styles to our page. Specifically, we define the unordered list as a flex container and give list items width: 25%. Here are the associated CSS rules:
Continue reading %Quick Tip: User Sortable Lists with Flexbox and jQuery%
[special]DOM traversal means that once you have selected an element or elements on a web page, you can move through the page elements relative to your initial selection. During this process, you can either replace the original selection with a new one or add and subtract elements from it.[/special]
In this article we will look at the available methods for jQuery DOM traversal, and see how the library provides many ways for us to easily select elements based on their relationships to other elements in the page.
Filtering Elements
Let's begin by looking at how to filter a selection down to something more specific. You can filter elements based on a lot of conditions like their position with respect to other elements and whether or not they have a specific class. Most of the time, you will end up with fewer elements selected than you began with.
Here is a list of the different filtering methods:
-
eq — This method reduces the set of matched elements to the one that is located at the index you specified. The indexing is zero based. Therefore, to select the first element, you will have to use
$("selector").eq(0). Starting with version 1.4, you can provide a negative integer to begin counting elements from the end instead of the beginning. -
first and last— The
firstmethod will return just the first element from the set of matched elements whilelastwill return the last element from the set of matched elements. Neither of these methods accepts any arguments. -
slice — If you are looking for all elements in a set whose index lies within a given range, you can using
slice(). This method accepts two arguments. The first one specifies the starting index from which the method should start slicing and the second argument specifies the index at which the selection should end. The second argument is optional and if omitted results in the selection of all elements whose index is greater than or equal tostart.See the Pen eq and slice methods by SitePoint (@SitePoint) on CodePen.
-
filter — This method will reduce your set of elements to those that either match the selector or pass the criteria set by you in the function that is passed to this method. Here is one example of this method with selectors:
$("li").filter(":even").css( "font-weight", "bold" );You could also select the same elements using a function:
$("li")
.filter(function( index ) {
   return index % 2 === 0;
})
.css( "font-weight", "bold" );
You can also use the function to perform more complicated selections like:
Continue reading %A Comprehensive Look at jQuery DOM Traversal%
In a previous post, I covered the process of converting a Bootstrap carousel into a full screen carousel with a random initial image. Today, I'll build on that and show you how to use GSAP (GreenSock Animation Platform), a popular JavaScript library, for animating Bootstrap carousels.

Before going any further, let's look at what we'll be building. There's also a demo at the end of the article.
Note: We'll use Bootstrap 3 styles to create the carousel. However, there's also a second version of it available which is compatible with Bootstrap 4 alpha release (latest release at the time of this writing).
Building the Carousel
Be sure to include Bootstrap and jQuery (Bootstrap's JavaScript components require it) in your page, for example, from a CDN:
<!DOCTYPE HTML>
<html>
  <head>
    <meta charset="utf-8">
    <title>Using GSAP to Animate Bootstrap 3 Carousels</title>
    <link rel="stylesheet" type="text/css" href="https://maxcdn.bootstrapcdn.com/bootstrap/3.3.7/css/bootstrap.min.css">
  </head>
  <body>
    ...
    <script src="https://cdnjs.cloudflare.com/ajax/libs/jquery/2.2.4/jquery.min.js"></script>
    <script src="https://maxcdn.bootstrapcdn.com/bootstrap/3.3.6/js/bootstrap.min.js"></script>
  </body>
</html>
Note that Bootstrap's JavaScript requires jQuery version 1.9.1 or higher, but lower than version 3.
The basic structure of our carousel looks like this:
<div id="mycarousel" class="carousel slide" data-ride="carousel">
  <ol class="carousel-indicators">
    <li data-target="#mycarousel" data-slide-to="0" class="active"></li>
    <li data-target="#mycarousel" data-slide-to="1"></li>
  </ol>

  <div class="carousel-inner" role="listbox">

    <!-- first slide -->
    <div class="item first active" id="1">
      <!-- content here -->
    </div>

    <!-- second slide -->
    <div class="item second" id="2">
      <!-- content here -->
    </div>

  </div><!-- /carousel-inner -->

</div>
As you can see, it contains two slides. The first slide has a class of first and an id of 1, while the second one has a class of second and an id of 2.
Regarding their styles:
- We set their height equal to the viewport height and
- give them different background colors.
The associated CSS rules:
.item {
  height: 100vh;
}

.first {
  background: #D98F4F; /*orange*/
}

.second {
  background: #2c9cae; /*lightblue*/
}
This should be enough to give us a working carousel.
Building the First Slide
Next, we take advantage of Bootstrap's helper classes (e.g. grid classes) to set up the contents for our slides.
The markup for the first slide is the following:
<div class="item first active" id="1">
  <div class="carousel-caption">
    <div class="container">
      <div class="row">

        <div class="col col-xs-6">
          <h2 class="title">
            <!-- content here -->
          </h2>
          <p class="desc">
            <!-- content here -->
          </p>
          <ul class="list">
            <!-- list items here -->
          </ul>
        </div>

        <div class="col col-xs-6">
          <div class="pc-wrapper">
            <img class="pc" src="IMG_PATH" alt="" width="" height="">
            <div class="price">
              <!-- content here -->
            </div><!-- /price -->
          </div><!-- /pc-wrapper -->
          <img class="keyboard" src="IMG_PATH" alt="" width="" height="">
          <button type="button" class="btn btn-danger btn-lg">
            <!-- content here -->
          </button>
        </div>

      </div><!-- /row -->
    </div><!-- /container -->
  </div><!-- /carousel-caption -->
</div><!-- /item -->
If you're following along, be sure to replace IMG_PATH with something sensible. You can grab the URLs for the images from the final demo.
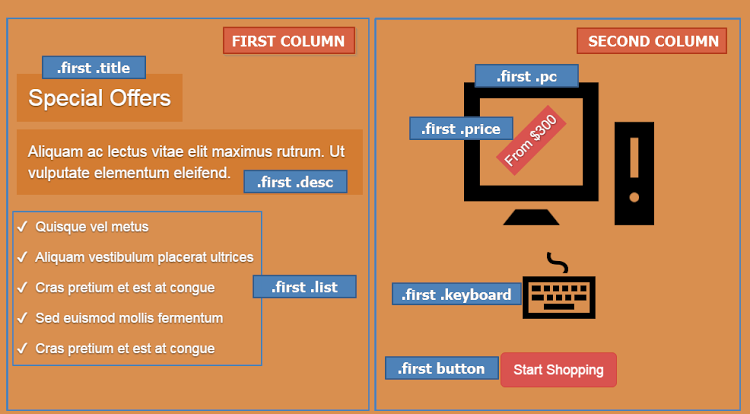
Here's its visualization:
Building the Second Slide
In the same way, here's the markup for the second slide:
Continue reading %Animating Bootstrap Carousels with the GSAP Animation Library%
Filtering and sorting parts of your website is a great way to organize content. Portfolios, albums, and blogs are just a few examples of things you might want to categorize. To achieve this, many JavaScript libraries can help. Two of the most popular ones are the MixItUp and Isotope libraries.
In this article, I'll go over the basic features of MixItUp 3 (the latest release at the time of writing) and show you all the steps needed to take advantage of it in your projects. To better demonstrate how this library works, I've also created a demo, which I'll refer to throughout the article.
Note: This article was updated in February 2017 to cover v3 of the MixItUp library
What is MixItUp 3?
As mentioned above, MixItUp 3 is a dependency-free, JavaScript library that allows you to filter and sort elements using CSS-based animations. Created by Patrick Kunka, it comes with a number of different customization options and detailed documentation. You can integrate it easily into your existing layouts. All that's needed is to target the desired elements and the library will do the grunt work for you.
For non-commercial projects, you can use it for free. However, commercial projects require a license. More information is available on this page.
The library works in all modern browsers (including IE10+ with full functionality, and a fallback functional but with no animations in IE8+).
Now that we've seen what the library does, let's see the required steps in order to use it.
Getting Started with MixItUp 3
To get started with MixItUp 3, you first have to include it in your projects. You can download it by visiting its GitHub page or by using a package manager like npm.
For our demo, we'll use the first option. The required script will be placed before the closing </body> tag, like this:
  ...
  <script src="/path/to/mixitup.min.js"></script>
</body>
Continue reading %Animated Filtering & Sorting with the MixItUp 3 JS Library%