jquery4u.com - Archives (aout 2014)
1 jQuery Fan Blog for your Daily News, Plugins, Tuts/Tips & Code Snippets.
Without any doubt Ajax has taken web development by storm and it's one of the most successful paradigms ever. In my article An Introduction to jQuery’s Shorthand Ajax Methods, I discussed some of jQuery's most used Ajax shorthand methods: $.get(), $.post(), and $.load(). They are convenient methods for making Ajax requests in a few lines of code.
Sometimes, we need more control over the Ajax calls we want to make. For example, we want to specify what should happen in case an Ajax call fails or we need to perform an Ajax request but its result is only needed if retrieved within a certain amount of time. In such situations, we can rely on another function provided by jQuery, called $.ajax(), that is the topic of this tutorial.
The $.ajax() Function
The jQuery's $.ajax() function is used to perform an asynchronous HTTP request. It was added to the library a long time ago, existing since version 1.0. The $.ajax() function is what every function discussed in the previously mentioned article calls behind the scene using a preset configuration. The signatures of this function are shown below:
[js]
$.ajax(url[, options])
$.ajax([options])
[/js]
The url parameter is a string containing the URL you want to reach with the Ajax call, while options is an object literal containing the configuration for the Ajax request.
In its first form, this function performs an Ajax request using the url parameter and the options specified in options. In the second form, the URL is specified in the options parameter, or can be omitted in which case the request is made to the current page.
The list of the options accepted by this function, described in the next section, is very long. So, I'll keep their description short. In case you want to study in-depth their meaning, you can refer to the official documentation of $.ajax().
The option Parameter
There are a lot of different options you can specify to bend $.ajax() to your need. In the list below you can find their names and their description sorted in alphabetic order:Continue reading %How to Use jQuery’s $.ajax() Function%
AngularJS is a feature-rich framework for creating single-page web applications, bringing all capabilities that one needs for building rich and interactive apps. One of the key features that Angular brings is the support of animations.
We can animate a portion of the application to indicate a change occurring. In my last article I covered the support of CSS animations in Angular applications. In this article, we will see how to leverage JavaScript to animate the AngularJS apps.
In Angular, the only difference between CSS and JavaScript animations is their definition. There is no difference in the way the defined animations are used. To start with, we need to load the ngAnimate module to the root module of our application.
The animation events to be handled in the JavaScript animation also remain the same. Following is a list of directives supporting animations and their events for different actions:
| Directives | Events |
|---|---|
| ng-view ng-include ng-switch ng-if |
enter leave |
| ng-repeat | enter leave move |
| ng-show ng-hide ng-class |
add remove |
The above listing is the same as the one in the previous article, but doesn’t mention the corresponding CSS classes, as we don’t need them to define JavaScript animations. These events are generated only if the application module loads the ngAnimate module. Now let us see how to animate some of the directives.
Continue reading %JavaScript Animations in AngularJS Applications%
Raise your hand if you've never heard the term Ajax. I’ll bet almost all of you have your arms down, close to their body. Ajax, which originally stood for Asynchronous JavaScript and XML, is one of the most used client-side methodologies, helping to create asynchronous websites and web applications.
Performing Ajax calls using raw JavaScript is of course possible, but dealing with all the different parts of the code can be a pain. This is even more true if you have to support a prehistoric browser like Internet Explorer 6.
Fortunately for us, jQuery provides a set of methods that deal with these issues for us, allowing us to focus on the task we want accomplish with the code. jQuery offers a primary method, called $.ajax(), which is highly configurable to fit whatever need you may have. It also provides a set of [shorthand methods](http://api.jquery.com/category/ajax/shorthand-methods/), called shorthand because they are simply wrappers for the $.ajax() method with a preset configuration, each serving a single purpose.
All except the $.ajax() method have one feature in common: they don’t operate on a set of DOM elements, but are called directly from the jQuery object. So, instead of having a statement like:
which selects all the paragraphs in the page and then calls the ajax() method, we’ll write:
In this article, we’ll discuss three of the most used jQuery shorthand methods: load(), $.post(), and $.get().
load()
The first method we’ll discuss is load(). It enables us to load data from the server and place the returned data (often HTML code) into the elements matched by the selection. Before seeing it in action, let’s see its signature:
The meaning of each parameter is described below:
Continue reading %An Introduction to jQuery’s Shorthand Ajax Methods%
We want our visitors to get our content as fast as possible, which means the content needs to be light, and with the minimum number of requests. But we want to keep users on our pages, and be entertained. This is where embedding videos enters the scene.
Videos illustrate our textual content, bring life to it, and are often served by a third party. What more to ask? Well, there’s a hidden price tag: Videos are slow and heavy to download, even when the visitor is not watching them.
One simple video on a page called through an innocuous iframe can add up to 6 HTTP requests and as much as 450kb of content. The solution I’m proposing in this article can reduce those numbers to 1 request and about 50kb per video, along with a few bytes of JavaScript (on top of the jQuery library if you don’t like vanilla flavor).
And you know what? This solution is not new. It was previously proposed by Amit Agarwal in April 2013.
So, What’s the Trick?
In Amit’s solution, the DOM is parsed by JavaScript on document load, and each call to a YouTube video (through a special div, not a regular iframe) is replaced by a thumbnail preview to which is attached the iframe when clicking on it.
This way, we get a nice preview thumbnail still served by a third-party server that’s a fraction of the weight of the full video player. The video player is loaded only when the video is actually viewed.
My Little Added Value
I rewrote Amit’s code in plain JavaScript and with jQuery for those interested. I kept the original comments in the code to keep it as understandable as possible. My version adds a new feature in the HTML5 data parameter that enables you to add any parameter to the YouTube URL to customize your video.
YouTube offers a list of parameters to show and hide controls, branding, and info, and to set the video quality or the starting frame of your video (among other things).
- controls: set this to 0, and the layer controls are not displayed on the video player.
- modestbranding: set this to 1, and the YouTube logo disappears from the control bar.
- rel: set this to 0, and no related videos will be shown when the playback of the initial video ends.
- showinfo: set this to 0, and the player will not display information like the video title and uploader before the video starts playing.
- start: set this to a number of seconds, and the player begins playing the video from this time (or rather from the closest keyframe).
- vq: set this to the wanted video quality, if supported (e.g.:
hd720when high quality is available)
When adding the YouTube iframe on the click event, some parameters are given values, namely autoplay (we want the video to start as soon as its thumbnail is clicked) and autohide (to hide the video progress bar and the player controls when no interaction is detected).
Continue reading %Faster YouTube Embeds with JavaScript%
The web changes every day. New technologies and techniques emerge and others disappear. For this reason, web designers and front-end developers have to be familiar with many of the latest web design trends. Parallax scrolling, fixed headers, flat design, one-page websites, and animations are some of the hottest current web trends.
In this tutorial, we’ll take a look at scroll-based animations and effects using CSS and jQuery.
The four effects that we’ll be creating can be viewed in this demo. But before we get to the effects, let’s have a brief intro.
Note: The code used in this tutorial could be improved with object caching and the use of CSS animations instead of jQuery's `animate()` method, but for simplicity, we've repeated object declarations and we've kept everything inside jQuery to keep things focused on the concepts.
What are Scroll-based Animations and Effects?
Scroll-based animations and effects are a new, yet well-known technique that gives front-end developers the ability to create rich and interactive web experiences. They’re fired when a user scrolls down a page and they can be easily manipulated and implemented with CSS and jQuery.
In order to detect whether a user is scrolling down the page, we use jQuery’s scroll() event.
Once we know that the user is scrolling, we can get the vertical position of the window’s scrollbar using jQuery’s scrollTop() method and apply the desired effects:
[code language="javascript"] $(window).scroll(function() { if ($(this).scrollTop() > 0) { // apply effects and animations } }); [/code]Are They Responsive?
If we’re interested in creating responsive scroll-based effects, we have to define the following properties:
- The browser window’s
widthproperty. - The browser window’s
heightproperty.
Without these properties defined, we create scroll-based effects that are “static” and will not work correctly when the user resizes the window’s either horizontally or vertically.
We can easily retrieve the values of these properties using jQuery’s width() and height() methods.
Continue reading %An Introduction to jQuery Scroll-based Animations%
The World Wide Web Consortium’s Web Audio working draft is a high-level API that allows developers to process, synthesize, and analyze audio signals in web applications like HTML5 games or virtual musical instruments.
Web Audio uses an AudioContext interface to represent AudioNodes. Within the AudioContext an audio file, as an example, is connected to a processing node, which in turn, is connected to a destination like the speakers on your laptop. Each node in the AudioContext is modular so that a web developer can plug (or unplug) nodes like a toddler snapping Lego blocks in place to build relatively more complicated structures.
One of the best ways to become familiar with the Web Audio API is to simply use it. In this article, I am going to describe how to build a very basic virtual synth pad that will play audio samples and provide a basic reverb feature. This HTML synth pad is going to be far from the tone generating instruments that professional musicians use, but it will show us how to:
- Create an AudioContext
- Load audio files
- Play audio files
- Add a volume control
- Loop audio samples
- Stop audio playback
- Create a reverb effect
- Create an audio filter
If you want to jump ahead, visit this demo page to see what we'll be building in this tutorial.
Creating the Synth Pad in our HTML
This very basic virtual synth pad will be presented in a web browser, so let’s begin with the markup, adding four “pads” to a page.
I included the jQuery JavaScript library via Google’s content delivery network. jQuery is in no way required for the Web Audio API, but its powerful selectors will make it a lot easier to interact with the HTML pads. I am also linking to a local JavaScript file that will contain the code for working with the Web Audio API.
I have assigned a data attribute to each of the pads with information about each pad’s associated sound file. Here’s the relevant HTML:
[code language="html"]I use CSS to lay out the four pads in a two-by-two grid, since this would be a standard configuration for a small synth pad. I set a width value for the <section> element and have each ‘pad’ element display as inline-block.
Creating an AudioContext
Let’s start the scripting. I create a new AudioContext with a single line.
Continue reading %HTML5 Web Audio API Tutorial: Building a Virtual Synth Pad%
jQuery is the most used JavaScript library in the world, but all of us already knew that. Despite the fact that in recent months a lot of criticisms have been raised, it still attracts a lot of attention among developers. Whether you're a jQuery beginner or a JavaScript expert (Dave Methvin and other team members are excluded), you might not know some peculiarities of jQuery. In this article we'll discuss five of them.
Returning false in Event Binders
As we all know, jQuery's first aim is to standardize the way different browsers behave using a unified set of methods. Where possible, jQuery enhances the features of a browser, integrating those that aren't supported natively. Think of the selectors that you can use thanks to jQuery that aren't natively supported by Internet Explorer 6 and 7 (the attribute selectors, :not, :last-child, and so on).
Sometimes, although these are rare exceptions, jQuery slightly diverges from standard behavior. An example is that returning false in a jQuery event handler (for example one attached to on()) is the same as calling:
[js]
event.stopPropagation();
event.preventDefault();
[/js]
On the contrary, returning false in native event handlers like addEventListener() is equivalent to writing:
[js]
event.preventDefault();
[/js]
This behavior can be proven by taking a look at the relevant part of jQuery's source:
[js]
if ( ret !== undefined ) {
if ( (event.result = ret) === false ) {
event.preventDefault();
event.stopPropagation();
}
}
[/js]
Pseudo-selectors Do More Than You Think
In the jQuery documentation of many pseudo-selectors you can find the following note (in this case in relation to the:checkbox pseudo-selector):
$( ":checkbox" ) is equivalent to $( "[type=checkbox]" ). As with other pseudo-class selectors (those that begin with a ":") it is recommended to precede it with a tag name or some other selectors; otherwise, the universal selector ("*") is implied. In other words, the bare $(':checkbox') is equivalent to $( "*:checkbox" ), so $( "input:checkbox" ) should be used instead.Now, let's take a look at the actual code in jQuery: [js] function createInputPseudo( type ) { return function( elem ) { var name = elem.nodeName.toLowerCase(); return name === "input" && elem.type === type; }; } [/js] As you can see from the code, the documentation is slightly incorrect.
$(':checkbox') is actually equivalent to $('input[type="checkbox"]') with regards to what it searches (note the name === "input"), but tests all the elements of the page as if you called it specifying the universal selector or nothing at all.
With this in mind, you may be tempted to not prepend the element selector anymore when using filters like this and write:
[js]
var $checkboxes = $(':checkbox');
[/js]
However, for performance reasons, it's still worth it to use it so that jQuery won't scan every element of the page. Thus, you should still write a statement like:
[js]
var $checkboxes = $('input:checkbox');
[/js]Continue reading %5 Little Known Details About jQuery Methods%
When I need to create charts, my first choice is Google Charts or another dedicated library. Sometimes, though, I need some specific features that I can’t find there. In these cases, SVG images prove to be very valuable.
Recently, I had to build a report page that was able to show a map of Italy in which each region had a different color tone according to some values retrieved from a database. Thanks to SVG, this task was very easy.
Creating the SVG Map in Illustrator
First, I drew a map of Italy with Illustrator:
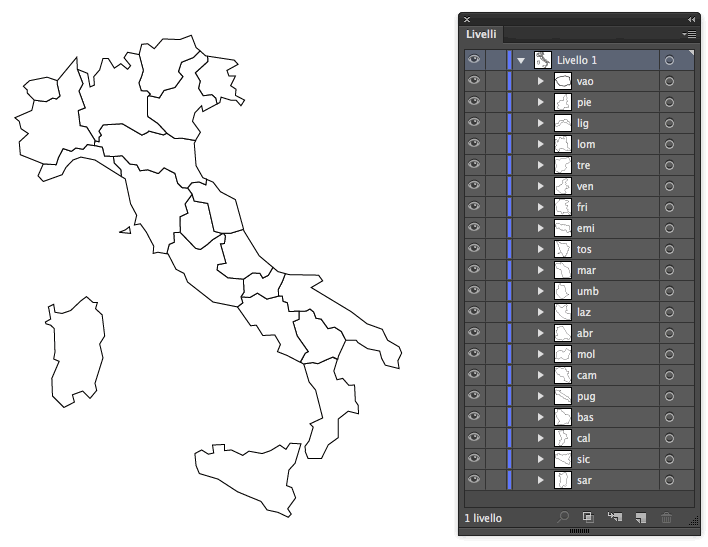
Every region is drawn as a single object, and each of them has its own level, with a name matching the code used in the database to identify its relative data (for example: “tos” for Tuscany).
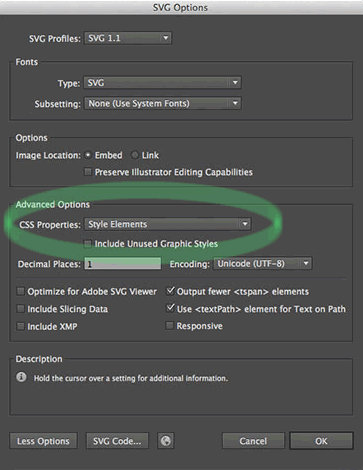
Finally the map must be saved as an SVG file. You have to pay attention to set the “CSS property” option to “Style Elements” in Illustrator, as shown below:
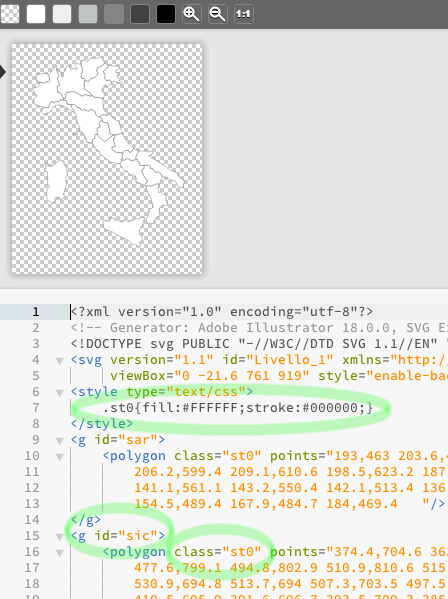
Opening the file just created, you will see it contains a set of g tags whose IDs match the names of Illustrator levels.
Building our HTML File
Each item contained in g tags has a st0 class so that the stroke and fill CSS properties can be assigned to them:
If you try to change those values, the map will change immediately:
Continue reading %Dynamic Geo Maps with SVG and jQuery%