jquery4u.com - Archives (juin 2017)
1 jQuery Fan Blog for your Daily News, Plugins, Tuts/Tips & Code Snippets.
This really is a must read for any JavaScript-based developer. I have written this article as a vital source of reference for learning shorthand JavaScript coding techniques that I have picked up over the years. To help you understand what is going on I have included the longhand versions to give some coding perspective.
June 14th, 2017: This article was updated to add new shorthand tips based on ES6. If you want to learn more about the changes in ES6, sign up for SitePoint Premium and check out our screencast A Look into ES6
1. The Ternary Operator
This is a great code saver when you want to write an if..else statement in just one line.
Longhand:
const x = 20;
let big;

if (x > 10) {
    big = true;
} else {
    big = false;
}
Shorthand:
const big = x > 10 ? true : false;
You can also nest your if statement like this:
const big = x > 10 ? " greater 10" : x < 5 ? "less 5" : "between 5 and 10";
2. Short-Circuit Evaluation Shorthand
When assigning a variable value to another variable, you may want to ensure that the source variable is not null, undefined or empty. You can either write a long if statement with multiple conditionals, or use a short-circuit evaluation.
Longhand:
if (variable1 !== null || variable1 !== undefined || variable1 !== '') {
     let variable2 = variable1;
}
Shorthand:
const variable2 = variable1 || 'new';
Don’t believe me? Test it yourself (paste the following code in es6console):
let variable1;
let variable2 = variable1  || '';
console.log(variable2 === ''); // prints true

variable1 = 'foo';
variable2 = variable1  || '';
console.log(variable2); // prints foo
3. Declaring Variables Shorthand
It is good practice to declare your variable assignments at the beginning of your functions. This shorthand method can save you lots of time and space when declaring multiple variables at the same time.
Longhand:
let x;
let y;
let z = 3;
Shorthand:
let x, y, z=3;
4. If Presence Shorthand
This might be trivial, but worth a mention. When doing “if checks”, assignment operators can sometimes be omitted.
Longhand:
if (likeJavaScript === true)
Shorthand:
if (likeJavaScript)
Here is another example. If “a” is NOT equal to true, then do something.
Longhand:
let a;
if ( a !== true ) {
// do something...
}
Shorthand:
let a;
if ( !a ) {
// do something...
}
5. JavaScript for Loop Shorthand
This little tip is really useful if you want plain JavaScript and not rely on external libraries such as jQuery or lodash.
Longhand:
for (let i = 0; i < allImgs.length; i++)
Shorthand:
for (let img in allImgs)
Shorthand for Array.forEach:
function logArrayElements(element, index, array) {
  console.log("a[" + index + "] = " + element);
}
[2, 5, 9].forEach(logArrayElements);
// logs:
// a[0] = 2
// a[1] = 5
// a[2] = 9
6. Short-Circuit Evaluation
Instead of writing six lines of code to assign a default value if the intended parameter is null or undefined, we can simply use a short-circuit logical operator and accomplish the same thing with just one line of code.
Longhand:
let dbHost;
if (process.env.DB_HOST) {
  dbHost = process.env.DB_HOST;
} else {
  dbHost = 'localhost';
}
Shorthand:
const dbHost = process.env.DB_HOST || 'localhost';
7. Decimal Base Exponents
You may have seen this one around. It’s essentially a fancy way to write numbers without the trailing zeros. For example, 1e7 essentially means 1 followed by 7 zeros. It represents a decimal base (which JavaScript interprets as a float type) equal to 10,000,000.
Longhand:
for (let i = 0; i < 10000; i++) {}
Shorthand:
for (let i = 0; i < 1e7; i++) {}

// All the below will evaluate to true
1e0 === 1;
1e1 === 10;
1e2 === 100;
1e3 === 1000;
1e4 === 10000;
1e5 === 100000;
8. Object Property Shorthand
Defining object literals in JavaScript makes life much easier. ES6 provides an even easier way of assigning properties to objects. If the property name is the same as the key name, you can take advantage of the shorthand notation.
Longhand:
const obj = { x:x, y:y };
Shorthand:
const obj = { x, y };
9. Arrow Functions Shorthand
Classical functions are easy to read and write in their plain form, but they do tend to become a bit verbose and confusing once you start nesting them in other function calls.
Longhand:
function sayHello(name) {
  console.log('Hello', name);
}

setTimeout(function() {
  console.log('Loaded')
}, 2000);

list.forEach(function(item) {
  console.log(item);
});
Shorthand:
sayHello = name => console.log('Hello', name);

setTimeout(() => console.log('Loaded'), 2000);

list.forEach(item => console.log(item));
10. Implicit Return Shorthand
Longhand:
function calcCircumference(diameter) {
  return Math.PI * diameter
}
Longhand:
calcCircumference = diameter => Math.PI * diameter;
11. Default Parameter Values
You can use the if statement to define default values for function parameters. In ES6, you can define the default values in the function declaration itself.
Continue reading %19+ JavaScript Shorthand Coding Techniques%
In my previous tutorial, I explained how powerful Bootstrap 3 CSS framework is for a novice designers. It ships with some of the best ready-to-use JavaScript and jQuery components and plugins. The framework has reached version 3.3.7 and it's getting ready for the release of v.4 beta, which will bring about several important and necessary changes.
In this tutorial we will be talking about one of the most useful jQuery Bootstrap plugins, The Modal.
The Bootstrap Modal is a lightweight multi-purpose JavaScript popup that is customizable and responsive. It can be used to display alert popups, videos, and images in a website. Websites built with Bootstrap can use the modal to showcase (for example) terms and conditions (as part of a signup process), videos (similar to a standard light box), or even social media widgets.
Now let’s examine the different parts of Bootstrap’s modal, so we can understand it better.
The Bootstrap Modal is divided into three primary sections: the header, body, and footer. Each has its own significance and hence should be used properly. We’ll discuss these shortly. The most exciting thing about Bootstrap’s modal? You don’t have to write a single line of JavaScript to use it! All the code and styles are predefined by Bootstrap. All that’s required is that you use the proper markup and the attributes to trigger it.
[author_more]
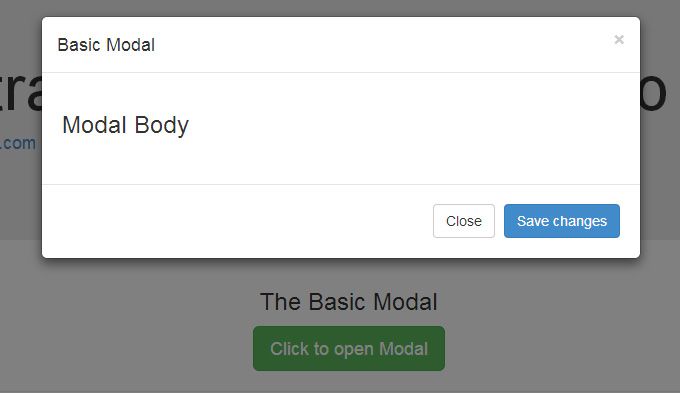
The Default Modal
The default Bootstrap Modal looks like this:
To trigger the modal, you’ll need to include a link or a button. The markup for the trigger element might look like this:
[code language="html"]
<a href="#" class="btn btn-lg btn-success"
data-toggle="modal"
data-target="#basicModal">Click to open Modal</a>
[/code]
Notice the link element has two custom data attributes: data-toggle and data-target. The toggle tells Bootstrap what to do and the target tells Bootstrap which element is going to open. So whenever a link like that is clicked, a modal with an id of “basicModal” will appear.
Now let’s see the code required to define the modal itself. Here is the markup:
[code language="html"]
<div class="modal fade" id="basicModal" tabindex="-1" role="dialog" aria-labelledby="basicModal" aria-hidden="true">
<div class="modal-dialog">
<div class="modal-content">
<div class="modal-header">
<button type="button" class="close" data-dismiss="modal" aria-hidden="true">&times;</button>
<h4 class="modal-title" id="myModalLabel">Modal title</h4>
</div>
<div class="modal-body">
<h3>Modal Body</h3>
</div>
<div class="modal-footer">
<button type="button" class="btn btn-default" data-dismiss="modal">Close</button>
<button type="button" class="btn btn-primary">Save changes</button>
</div>
</div>
</div>
</div>
[/code]
The parent div of the modal should have the same id as used in the trigger element above. In our case it would be id="basicModal".
Note: Custom attributes like aria-labelledby and aria-hidden in the parent modal element are used for accessibility. It is a good practice to make your website accessible to all, so you should include these attributes since they won’t negatively affect the standard functionality of the modal.
In the modal’s HTML, we can see a wrapper div nested inside the parent modal div. This div has a class of modal-content that tells bootstrap.js where to look for the contents of the modal. Inside this div, we need to place the three sections I mentioned earlier: the header, body, and footer.
The modal header, as the name implies, is used to give the modal a title and some other elements like the “x” close button. This should have a data-dismiss attribute that tells Bootstrap which element to hide.
Then we have the modal body, a sibling div of the modal header. Consider the body an open canvas to play with. You can add any kind of data inside the body, including a YouTube video embed, an image, or just about anything else.
Lastly, we have the modal footer. This area is by default right aligned. In this area you could place action buttons like “Save”, “Close”, “Accept”, etc., that are associated with the action the modal is displaying.
Now we are done with our first modal! You can check it out on our demo page.
Changing the Modal’s Size
Continue reading %Understanding Bootstrap Modals%