jquery4u.com - Archives (juillet 2017)
1 jQuery Fan Blog for your Daily News, Plugins, Tuts/Tips & Code Snippets.
When jQuery was released, one of the main reasons behind its meteoric rise to popularity was the ease with which it could select DOM elements, traverse them and modify their content. But that was way back in 2006. In those days we were stuck with Internet Explorer 7 and ECMAScript 5 was still a couple of years off.

Luckily, a lot has changed since then. Browsers have become considerably more standards compliant and native JavaScript has improved in leaps and bounds. And as things have improved, we have seen people questioning whether we still need jQuery. I'm not going to get into that argument here, rather I'd like to offer some food for thought, as I present six native DOM manipulation methods which were inspired by this great library. These are as follows:
In this article I want to examine the similarities and the differences between these native DOM manipulation methods and their jQuery counterparts. Then hopefully, the next time you find yourself including jQuery for the sake of a convenience method or two, you might opt to embrace the power of vanilla JavaScript instead.
1. append()
The append method performs an insertion operation, that is, it adds nodes to the DOM tree. As the name indicates, it appends the passed arguments to the list of children of the node on which it is invoked. Consider the following example:
const parent = document.createElement('div')
const child1 = document.createElement('h1')
parent.append(child1)
parent.outerHTML
// <div><h1></h1></div>

const child2 = document.createElement('h2')
parent.append(child2)
parent.outerHTML
// <div><h1></h1><h2></h2></div>
At this point you would be forgiven for asking how this differs from the native appendChild method. Well, a first distinction is that append() can take multiple arguments at once, and the respective nodes will be appended to the list of children, just like the jQuery append method. Continuing the previous snippet:
const child3 = document.createElement('p')
const child4 = document.createElement('p')
const child5 = document.createElement('p')
parent.append(child3, child4, child5)
parent.outerHTML
/* Outputs:
<div>
  <h1></h1>
  <h2></h2>
  <p></p>
  <p></p>
  <p></p>
</div>
*/
Furthermore, an argument can be even a string. So, while with appendChild() a rather verbose syntax must be employed:
parent.appendChild(document.createTextNode('just some text'))
with append() the same operation is shorter:
parent.append('just some text')
parent.outerHTML
/* Outputs:
<div>
  <h1></h1>
  <h2></h2>
  <p></p>
  <p></p>
  <p></p>
  just some text
</div>
*/
The string is converted to a Text node, so any HTML is not parsed:
parent.append('<p>foo</p>')
parent.outerHTML
/* Outputs:
<div>
<h1></h1>
<h2></h2>
<p></p>
<p></p>
<p></p>
just some text
<p>foo</p>
</div>
*/
This is in contrast to the jQuery method, where strings of markup are parsed and the corresponding nodes are generated and inserted into the DOM tree.
As is usually the case, if the appended node it is already present in the tree, it is first removed from its old position:
const myParent = document.createElement('div')
const child = document.createElement('h1')
myParent.append(child)
const myOtherParent = document.createElement('div')
const myOtherParent.append(child)
myOtherParent.outerHTML
// <div><h1></h1></div>

myParent.outerHTML
// <div></div>"
A final difference between append() and appendChild() is that the latter returns the appended node, whereas the former returns undefined.
2. prepend()
The prepend method is very similar to append(). Children are added, but this time they are prepended to the list of children of the node on which the method is called, just before the first child:
const parent = document.createElement('div')
const child1 = document.createElement('p')
parent.prepend(child1)
parent.outerHTML
// <div><p></p></div>

const child2 = document.createElement('h2')
parent.prepend('just some text', child2)
parent.outerHTML
/* Outputs:
<div>
  just some text
  <h2></h2>
  <p></p>
</div>
*/
The return value of the method is undefined. The corresponding jQuery method is prepend().
3. after()
The after method is another insertion method, but this time it must be called on a child node, that is, a node with a definite parent. Nodes are inserted as adjacent siblings, as can be seen in the following example:
const parent = document.createElement('ul')
const child = document.createElement('li')
child.append('First item')
parent.append(child)
child.after(document.createElement('li'))
parent.outerHTML
// <ul><li>First item</li><li></li></ul>
The return value is undefined and in jQuery the similar operation is after().
4. before()
The before method is similar to after(), but now the nodes are inserted before the child node:
const parent = document.createElement('ul')
const child = document.createElement('li')
child.append('First item')
parent.append(child)

const child1 = document.createElement('li')
child1.append('Second item')

const child2 = document.createElement('li')
child2.append('Third item')

child.before(child1, child2)

parent.outerHTML
/* Outputs:
<ul>
  <li>Second item</li>
  <li>Third item</li>
  <li>First item</li>
</ul>
*/
Once again, the return value is undefined. The respective jQuery method is before().
Continue reading %6 jQuery-inspired Native DOM Manipulation Methods You Should Know%
A live search is an enhanced search form that uses AJAX technology to deliver results or suggestions within the same view. This is different from a regular HTML input field that is given autocomplete powers from a modern browser like Chrome, Firefox or Safari. A live search is often an input field that has been programmed to load suggestions from a specific dataset.
July 6th, 2017: This article was rewritten to update the list of plugins, and include some bonus, non-jQuery libraries.
Using live search in your application greatly improves the user friendliness of your site. Whatever back-end technology you are using -- PHP, Java, Python, Ruby -- JavaScript is your best bet in implementing a client-side live search feature.
Before I proceed, I would like to point out that the term live search is a bit ambiguous. There's no authoritative definition for that term. Other terms that are frequently used to mean the same thing are autocomplete and type ahead.
I've come across a number of solutions labeled as live search which lack certain critical features. For this article, I'll only shortlist live search solutions that fit the definition I've defined above.
1. Ajax Live Search

The first one on this list is a pretty amazing open-sourced, live search jQuery plugin. It is well documented and works perfectly in Chrome, Firefox, Safari, Opera, and IE8. The most impressive feature is that it can return results in the form of a paginated table! How cool is that?
You can learn more about it in the following links:
2. Semantic UI Search Component

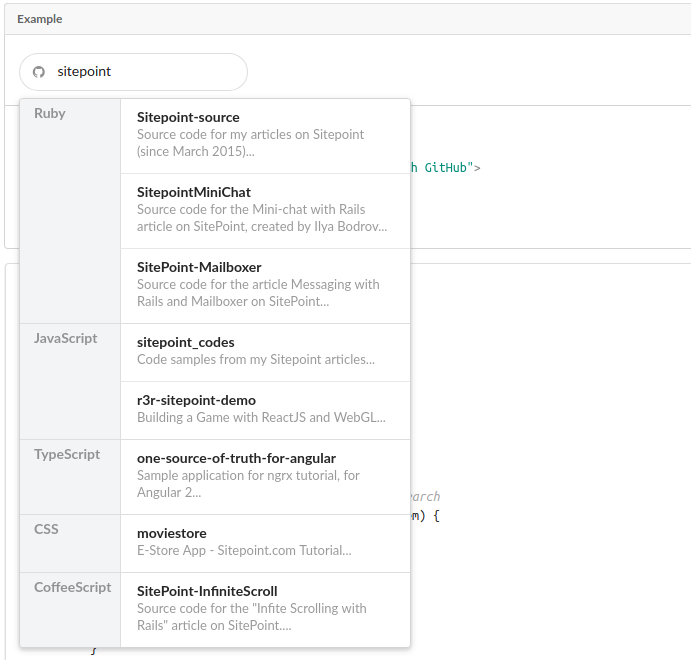
If you are into CSS frameworks, you should check out Semantic UI. They have a cool Search Component that allows you to implement live search on your forms very easily. Just take a look at this example code:
HTML:
<div class="ui search">
  <input class="prompt" type="text" placeholder="Search GitHub...">
  <div class="results"></div>
</div>
JavaScript:
$('.ui.search')
  .search({
    apiSettings: {
      url: '//api.github.com/search/repositories?q={query}'
    },
    fields: {
      results : 'items',
      title   : 'name',
      url     : 'html_url'
    },
    minCharacters : 3
  })
;
It's amazingly minimal yet powerful. If you use the API settings option, you can do customizations such as grouping results into categories!.

Semantic UI also comes in different flavors specifically built for React, Meteor, Ember, and Angular. Check out their integrations page for the full list.
To learn more, visit the following links.
3. jQueryUI Autocomplete

This is a jQuery widget that is part of the jQuery UI library. The library itself is a curated set of user interface components, effects, and themes built on top of jQuery.
Autocomplete comes with several templates to provide different implementations. Here is one such example:
HTML:
<div class="ui-widget">
  <label for="birds">Birds: </label>
  <input id="birds">
</div>

<div class="ui-widget" style="margin-top:2em; font-family:Arial">
  Result:
  <div id="log" style="height: 200px; width: 300px; overflow: auto;" class="ui-widget-content"></div>
</div>
JavaScript:
$( function() {
  function log( message ) {
    $( "<div>" ).text( message ).prependTo( "#log" );
    $( "#log" ).scrollTop( 0 );
  }

  $( "#birds" ).autocomplete({
    source: "search.php",
    minLength: 2,
    select: function( event, ui ) {
      log( "Selected: " + ui.item.value + " aka " + ui.item.id );
    }
  });
} );
To learn more, visit the following links:
4. DevBridge jQuery AutoComplete

The DevBridge jQuery AutoComplete is a tiny JavaScript library that allows you to turn regular text input fields into autocomplete suggestion boxes. Its API is vast and well documented allowing you to perform quite a number of different configurations. Implementing it is quite simple, check out this example:
HTML:
<input type="text" name="country" id="autocomplete"/>
JavaScript(AJAX lookup):
// AJAX Lookup
$('#autocomplete').autocomplete({
    serviceUrl: '/autocomplete/countries',
    onSelect: function (suggestion) {
        alert('You selected: ' + suggestion.value + ', ' + suggestion.data);
    }
});
JavaScript(Local lookup):
var countries = [
   { value: 'Andorra', data: 'AD' },
   // ...
   { value: 'Zimbabwe', data: 'ZZ' }
];

$('#autocomplete').autocomplete({
    lookup: countries,
    onSelect: function (suggestion) {
        alert('You selected: ' + suggestion.value + ', ' + suggestion.data);
    }
});
To learn more, visit the following link:
5. EasyAutocomplete

EasyAutocomplete is a highly customizable jQuery autocomplete plugin with all the commonly required features. It supports local and remote data sets in JSON, XML, and plain text formats. It also supports callback handlers along with some default styling.
What sets this plugin apart is their templates feature. Templates are used to define the results view. You can create a custom template or use one of the available built-in presets which include:
- Description Template
- Icon Right/Left Template
- Link Template
Continue reading %14 jQuery Live Search Plugins%